


DIY Furniture Ideas
Oh the Things You Can Do!
DIY projects involving the making, modifying or refurbishing of furniture is quickly becoming a passion for many who have discovered the therapy involved with creating one’s own pieces of furniture, not to mention the amount of money one can save! Repurposing pieces of unlikely candidates such as pallets into intriguing pieces for your home or giving a neglected furniture piece a new lease on life with a fantastic makeover is truly a labor of love. The types of projects involved with DIY furniture ideas are as numbered and as varied as the people who do them—which simply means the ideas are endless!
Here you’ll discover some nifty ideas you can easily bring to fruition if making your own furniture creations is on your “to-do” list! You’ll spend very little money; and the sense of satisfaction you will feel will become delightfully addictive.
If you do any furniture projects involving pallets, there are a few insights regarding pallets you need to be aware of before your project begins. Here are a couple pallet ideas for your DIY projects as well as projects that utilize an old door, an old dresser and some old books!
Know Your Pallets!
Regarding pallets: be aware of two codes, in particular, that you may notice stamped on the pallet’s side: one code could be “HT” which means the pallet was heat-treated (to thwart insects) and would be safe for repurposing. If you see the code “MB”, leave the pallet alone since it was treated with a chemical called Methyl Bromide. If a pallet has no visible logo or code, assume that it shouldn’t be used since it may have been chemically-treated.
Finding “HT” pallets isn’t that difficult; and in fact, small garden and hardware stores, motorcycle shops, lawnmower and power equipment stores are usually good places to pick up free, useable pallets! Many times, these businesses have plenty on hand, so just ask.
1: Oh Pallet Christmas Tree, Oh Pallet Christmas Tree:
The holidays are fast approaching and if you have a large empty wall that could use some festive personality, then you’ll love this project!
*** You will remove the planks from your pallet and cut them into specific lengths, as follows: 19.5”, 17”, 14.5”, 12”, 9.5”, 7” and 4.5”.
*** Horizontally lay the pieces on a table so they are arranged with the shortest piece at the top and continue in ascending order so the longest piece is at the bottom. Space them about 2” apart (give or take) and you will notice the Christmas tree taking shape.
*** Take a longer pallet plank and lay vertically on top those pieces—that longer piece needs to reach from the smallest top plank down to the 19.5” piece and at least 6 inches beyond the bottom of the tree-to-be. The ‘beyond’ section will be an extension of the trunk of the tree. Screw the long, vertical piece to the horizontal pieces, allowing 2 screws for each fastened plank.
*** Spray-paint the tree a festive green. Cut a wooden star, paint it yellow or gold, and add to the top of the tree or hot-glue a pre-made star or other topper.
*** Drill small holes into the tree so small Christmas lights can be inserted from the back. The lights’ holders may require a drop of hot-glue to stay in place. Turn on the tree’s lights—voile`! Let the compliments begin!
2: Pallet Bed-frame:
If you find yourself without a bedframe for a while, here’s an idea that is not only incredibly easy, but over-the-top cute!
*** Find 6 to 8 large pallets—they will be used to elevate your mattresses to give your bed a finished look that is sure to be a conversation piece! If you desire your bed to be higher, just add a second layer of pallets—easy deal! You can paint your pallets, stain them, white-wash them or just add a coat of polyurethane to maintain a more rustic appearance.
Once the pallets are completely dry, you are ready to place your mattresses on top. What you want to achieve, however, is an extension of the pallets to go beyond the rear of your bed. This way, you will have created a sitting space that can be embellished with seat-cushions and pillows! How fun and functional is that?
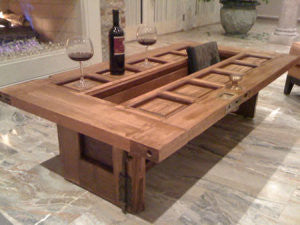
3: Old-Door Coffee Table:
Talk about rustic! If you happen to stumble across an old door, grab it since it can be converted into a whimsical coffee table full of country charm! If a doorknob is attached, it wouldn’t necessarily need to be removed; and that would depend on individual preferences. Any hinges, keyholes or other embellishments could remain, adding that much more character.
*** Stripping the door is optional.
*** Cut the door into 3 sections allowing one section to be larger than the other two since it will serve as the table’s top while the other two identically-sized pieces will serve as the sides of the table and the support pieces.
*** The two side panels will be screwed under each side edge of the larger piece. Add wood-putty to cover the areas where screws were added and sand.
*** An easy make-over could include a coat or two of new paint. For a more antiqued appearance, sandpaper any edges and then cover entire table with polyurethane.
*** Add brass corner covers for a sassy, spunky embellishment!
You have just created an exquisite work of art!
4: Dresser—From Beast to Beauty:
This project is so dynamic! Find a regular, elongated dresser from a thrift store or perhaps one you already have but no longer use. Be prepared to find a spot for your new entertainment center!
*** Remove any middle and lower supports—envision, for example, drawers along the top of the dresser with a completely empty space below them. The top drawers will remain but within the lower now-empty space, you can add a single shelf running the entire middle of the inside width.
*** Strip the old finish if you desire or add primer and paint without stripping. A stunning color-choice suggestion would be a deep mustard-yellow over the entire piece except for the top that would be painted a rich chestnut brown. Contrasting colors make for a striking appearance!
*** Add new, bold knobs for the top drawers.
Your television can sit atop your new entertainment center while a stereo and speakers rest on the middle shelf installed below. Below the shelf, you can arrange baskets that can store DVDs, remotes, game controls etc. Everything will be in one spot; and that one spot never looked so inviting!
5: An Old-book Lamp:
This piece is guaranteed to become a conversation-starter regardless of what room you might put it in! All you need are some old books (thrift stores have plenty of them), a standard lamp kit and something that will serve as the shade.
*** Use spray-paint to cover all the brass fittings—black paint is always a good choice.
*** While the fittings are drying, you will stack your books—largest at the bottom and smallest at the top. A nice look is to have all binders aligned with one another, but not necessarily perfectly lined up since this would add a more natural appearance.
*** Take the threaded rod from the lamp kit and stand it next to your stacked books to make sure it will be high enough--you will want the rod (which will house the wiring) to be about an inch higher than the top of the book stack so it can accommodate the remainder of the lamp parts. If necessary, simply remove the top book to ensure the rod will be long enough to allow for that one-inch protrusion.
*** Clamp the largest book onto your work space so it remains stationary. Use a ½-inch drill bit and drill half-way through the center of the book. Open the book so you can readily see that one side of the book will have a hole while the other half will not.
*** The inside of the book where the drilled hole is, is where you will create a ‘channel’ or elongated cut-away area. The channel will be used to position and secure the electric cord so the cord can travel from inside the book to be plugged into the wall. Use a box-cutter to cut out a space from the center hole to the edge of the pages so the electric cord can snuggly fit.
*** Attach the threaded rod to the book you have been working with by sliding it through the drilled hole and add washer and lock-nuts to tighten the rod inside the book. Close the book and your threaded rod will be protruding from the book’s cover and will need to be tightened on that side, as well.
*** Slide the wire through the rod and pull the wire out through the top of the rod and leave about 2 inches of the wire beyond the top of the rod so you can attach lamp parts. The wiring inside the book will be resting inside the channel you created.
*** Secure the book’s cover by using 1 ¼ inch screws to drill the cover permanently shut. Use at least four screws.
*** You are now ready to drill holes in the centers of the rest of the books. Keep in mind, the exact center point of each book does not have to be used. Once the holes are drilled, slide the books over the rod already embedded in the very first book.
*** As each book is slid over the rod, secure each book to the book below it with 2” screws. Use 3 to 4 screws each time. When screwing the very top book to the book below it, you won’t want screws to be exposed on the cover so open the top book’s cover and drill the screws through the first page and beyond to the book positioned underneath. Close the cover of the top book and you will have no unsightly screws showing!
*** Make sure the top book allows for the threaded rod with the wiring to be at least 1 inch exposed. Attach the rest of the lamp-kit parts by following the instructions that will be included with the kit.
*** Find a dynamic shade and place your beautiful new lamp in a place for all to see! Incredibly cozy!
DIY furniture—what a wonderful way to save a significant amount of money not to mention the personal satisfaction you will feel once each project is completed! You can create furnishings that will be one-of-a-kind works of art!


