


DIY Furniture Ideas
Let The Fun Begin!
Where does one begin when it comes to the topic of DIY ideas for furniture? There are so many creative projects one can do with previously used materials, such as upcycling wood pallets that can be repurposed into hundreds of different items such as wall decorations, tables, patio furniture, wine racks, garden gates and so much more!
Let’s cover a handful of super-cool ideas that might make you realize you don’t have to spend much money, at all, to decorate many areas of your home! You can modify and transform the simplest of materials to create furnishings that can end up saving you hundreds of dollars you might , otherwise, spent at a furniture store.
The following DIY projects are created from just pallets! These projects are quick and easy and can be completed within hours, once you have all the materials you would need.
Be Selective About Your Pallets!
Before beginning any pallet project, make sure the wood is cleaned with a garden hose and mild soap solution to remove any hidden insects or debris; and more importantly, be aware of how your pallets were treated. In order to prevent insect infestations, pallets are either treated with chemicals or heat; and both these methods will have their own logo on the side of the pallet. Avoid chemically-treated pallets which would have an “MB” insignia stamped on them. Heat-treated pallets are safe and are the only type you should use; and would have an “HT” logo on the side.
Small garden and hardware stores, motorcycle shops, lawnmower and power equipment stores are usually good places to pick up free, clean pallets! Many times, these types of businesses become inundated with pallets; and in some cases, end up having far too many on hand; and because of that, store-owners are eager to give them away.
The following pallet projects--aside from being quick and easy--are incredibly inexpensive; and once you are done, you will be amazed at how talented you really are!
1: Pallet Bed-frame:
Ok, so maybe you’re short on furniture and you don’t have a bedframe for your mattress yet—not a problem! No one really wants their mattress on the floor but if you acquire about 3 or 4 large pallets and decide what color you might want to paint them, you’ll have a bed-frame in no time.
The idea is to have your mattress centered on top of the newly-painted pallets; and if you want, you can stack a double-layer of pallets to give your mattress more height. Allow for extra pallet material to extend beyond the rear of the bed to automatically form a seating area where you can add a seat cushion and colorful pillows! Because this will look so cute, chances are you may choose not to purchase a bedframe down the road, at all!
2: Pallet Wine-rack:
This nifty wine rack will end up holding about 10 bottles of wine, and will add a chic, rustic look to any wall, especially in a country kitchen!
Here, you will saw a pallet in half and use one of those halves for the rack. The back of the chosen half will remain in-tact but remove all horizontal planks from the front except for the bottom 1 or 2 planks—the wine bottles will be placed behind them once your rack is completed. Obviously, the wine bottles will need a platform to sit on; and depending on your pallet, that platform may already be present.
You can stain, paint or white-wash the wood; and behind the entire back of the pallet, attach a wrought iron design if you are lucky enough to find an iron piece that would be right size. It would add a dash of rustic charm!
Purchase some dynamic knobs—something colorful in ceramic would partner beautifully with the wood! The shiny, smooth ceramic against the rough, weathered pallet would offer a stunning contrast! The knobs would be evenly spaced and attached to the front horizontal board(s) of the pallet to give your wine rack added flair. Cheers!
3: Hickory, Dickory Pallet Clock!
If you are fortunate enough to know someone who is even moderately knowledgeable with basic woodworking, you’re in luck as far as this project is concerned--you’re going to remove the planks from a pallet to create an adorable wall clock!
Once the planks from the pallet are removed (about a half-dozen of them), lay them on a table, placing them close together, and decide how large you want your clock to be—in other-words, what will be the size of the diameter of the clock’s face? Once that is determined, you can use a round platter or anything else that is round that will serve as your guide for drawing a circular shape on the pallet planks that are butted up to one another. Once the outline has been made with a marker, the rounded marks will be cut and the cut pieces will be glued and/or doweled together.
The center of the clock’s face will require a drilled hole to make way for the backs of the hands of the clock once a clock-mechanism kit is attached. Before that, however, you can leave the wood, as is, or add a coat of paint and even create an antiqued look by sandpapering the edges of the painted wood to produce a weathered appearance. You can stencil the numbers on the clock or not use numbers at all; but instead, attach screws, nuts or bolts where the numerals would normally be—one screw, nut or bolt for each position on the clock.
Insert your ‘AA’ batteries in the compartment on the back of your clock and you will have added a charming, weathered time-piece that will draw attention to any wall in your home!
4: Pallet Sofa-Table:
Sofa-tables are typically long, narrow tables that are placed behind a sofa or loveseat to add extra character to a room. When a lamp, a framed photo and a knick-knack or two are placed on the table, it adds a touch of coziness and warmth. Pallets offer the perfect material with which to make a sofa table; and a DIY project doesn’t get much easier than this one!
This involves using wood connectors or nuts and bolts to join two pallets together—back to back. The front panels of each pallet will stand in a vertical position once the table is completed.
Decide how you would like to coat the table-to-be: paint, stain or just a veneer? It will depend on what colors you have already incorporated in the room where the table will be located. The top of the adjoining pallets will form a good sized surface area that can be adorned with pave stones; and 12” or 16”-squares would work very well. Pavestones are inexpensive at about $2.00 a piece or less! However, if you want to get a little funky, try pave stones with inlayed glass or ceramic pieces---ewww, lah, lah---your table will be gorgeous!!
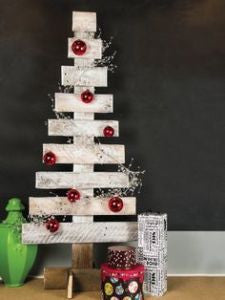
5: Deck the Halls with a Pallet Christmas Tree:
The holidays are upon us and even though this finished project isn’t officially a piece of ‘furniture’, per se, it makes for a cozy, ‘down-home’ wall-decoration— pallet pieces will come together to create a generous-sized Christmas tree! The finished tree would be especially suited for a larger wall and would create a ‘home-for-the-holidays’ kind of atmosphere!
This cheerful project involves removing the panels from a pallet to form the tree; and the steps are surprisingly easy!
*** Cut single pallet boards with the following lengths: 19.5”, 17”, 14.5”, 12”, 9.5”, 7” and 4.5”. Lay the boards horizontally on a table with the longest cut-board placed at the bottom, followed by the other lengths in descending order with the 4.5” board ending up at the top. Their positions on the table will form a Christmas-tree shape. Space the boards about 2” apart.
*** Take another pallet board that is long enough to be laid vertically upon the other pieces, reaching from the top board, all the way down to the longest board at the bottom. Allow enough extra length at the bottom to extend beyond the bottom horizontal board—that extension will form the ‘trunk’. Screw the ‘trunk’ to the other boards (the ‘limbs’); and use 2 screws per board.
*** Spray paint the tree a holiday-green.
If a family member is handy with woodworking, have your talented person cut out a wood star that can be painted gold or red and have it glued to the very top of the tree—how merry and bright! If you want to get even more creative, drill small holes throughout the tree so that single, miniature Christmas lights can partially slip through the holes, from the backside. When lit, your pallet Christmas tree will become one guaranteed conversation piece!
DIY furniture—it’s all about saving money, allowing your creative juices to flow and feeling incredibly satisfied about completing a project that can add fun and flair to any part of your home!


